October 2014
Billing for Time in QuickBooks: An Overview
If you sell your employees’ time and skills, you can use QuickBooks to record those hours and bill your customers for them.
If your small business sells products, you know how precisely you must track your starting stock numbers, ongoing inventory levels, and your reorder points. QuickBooks provides tools to help with this process, but human factors can sometimes throw off your careful counts.
Fortunately, QuickBooks is remarkably flexible when it comes to recording the time your employees spend on customers and jobs. You can enter information about a single activity — either billable or unbillable — and/or document hours in a timesheet. A built-in timer (the “Stopwatch”) helps you count the minutes automatically; you can also type them in manually.
One Work Session
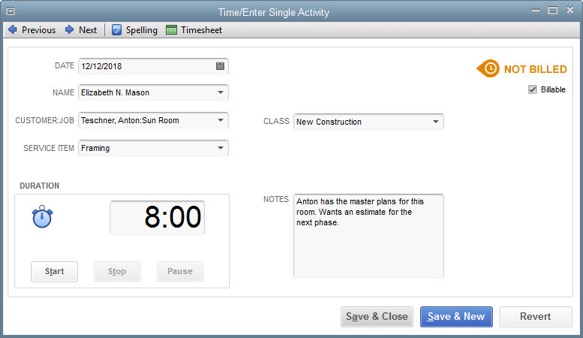
All versions of desktop QuickBooks include dialog boxes designed to help you enter all the details related to a single timed activity. To get there, either open the Employees menu and select Enter Time | Time/Enter Single Activity or click the down arrow next to the Enter Time icon on the Home Page and choose Time/Enter Single Activity.
Figure 1: QuickBooks helps you create records for individual activities completed by employees, which can be either billable or unbillable.
You fill out the fields in this window like you would any other in QuickBooks. Click the calendar icon in the DATE field to reflect the date the work was completed (not the current date), and click the down arrows in the fields that contain them to select options from a list. If you already know the duration of the activity, simply enter it in the field to the right of the clock icon. Otherwise, use the Start, Stop, and Pause buttons to let QuickBooks time it.
The Time/Enter Single Activity dialog box is designed to record one activity, not necessarily an entire workday, unless an employee only provides one service for one customer in a day. If he or she provides more than one service for one or more customers, you’ll need a fresh record for each.
Note: If the employee selected is timesheet-based, an additional field will appear above the CLASS field asking for the related PAYROLL ITEM. And if you’ve turned on workers’ compensation (and the employee is timesheet-based), a field titled WC CODE will drop into place below it. This must be done absolutely correctly, and it can get complicated. We can help you manage this feature.
A Comprehensive View
At the top of the Time/Enter Single Activity dialog box, you’ll see an icon labeled Timesheet. If you click on this with an employee’s name selected, his or her timesheet will open and display the hours already entered for that period. Or you can open a blank timesheet by opening the Employees menu and selecting Enter Time | Use Weekly Timesheet. You can also click the Enter Time icon on the Home Page.
Figure 2: You can access an employee’s timesheet from the Time/Enter Single Activity dialog box, from the Employees menu, or from the Home Page.
If you’ve entered all of the hours individually for an employee in a given time period, the timesheet should be correct when you click through from the Time/Enter Single Activity box. If not, you can edit cells by clicking in them and changing the data. Be sure that the Billable box is checked or unchecked correctly.
You can also enter hours directly on a timesheet instead of recording individual activities. Just select the employee’s name by clicking on the arrow in the NAME field at the top of the Weekly Timesheet dialog box and fill in the boxes.
Note: Individual activities that you enter for employees are automatically transferred to the timesheet format and vice-versa.
Billing for Time
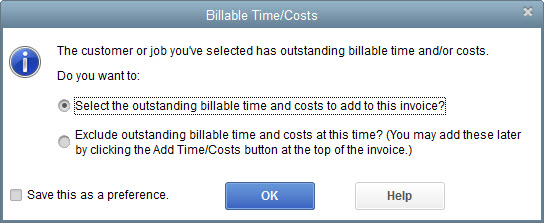
QuickBooks keeps track of all entered billable hours and reminds you of them when it’s time to invoice. If customers have outstanding time and/or costs, this dialog box will open the next time you start to create an invoice for them:
Figure 3: This dialog box is one of the ways QuickBooks helps you bill customers for everything they owe.
QuickBooks also provides several reports related to billing for time. We’ll be happy to go over them and – as always – help with any other questions you might have.
August 2014-Make a Statement in QuickBooks Online
You’re not required to use statements in QuickBooks, but they help bring unpaid amounts to the attention of your customers.
Collecting outstanding payments is probably one of your least favorite tasks as an accounting manager. QuickBooks Online helps you keep track of these debts in many ways, like through the Income Tracker and the Collections Report.
The Balance Forward (lists all activity within a specified date range) is another tool that isn’t used strictly for reminding customers of overdue invoices, but it can be effective in that endeavor: the QuickBooks Online statement. There are three types:
- Open Item (only includes unpaid transactions), and
- Transaction Statement (displays the receivables total and amount received within a stated period).
Figure 1: You can choose from among three different statement types in QuickBooks Online and select additional options.
QuickBooks Online’s Open Item statement would be most useful in collecting outstanding payments. There are two ways to get there. If you’re just sending one to a customer you know has past-due invoices, you can click on the Customers link in the left vertical pane and hover your cursor over that individual or company to highlight it. Then click the arrow next to the drop-down list in the ACTION column and select Send Statement.
If you’re sending multiple statements, click the “+” sign at the top of the screen; and then select Statements. Select Open Item, change the date if necessary, and check or uncheck the boxes below if needed. Click OK.
Note: QuickBooks Online gives you the option of creating and sending statements without looking at the list of selected customers. We do not recommend this. If your criteria have pulled in someone who shouldn’t receive a statement, your unnecessary mailing to them may be annoying.
The next screen will display a list of all customers who met your criteria. If you think you may have incorrectly defined your set of customers, click Change to return to the previous screen. You can also review QuickBooks Online’s Statement List (a report).
Note: If there are missing statements, check the original form’s date. Extra statements? Make sure you sent an invoice. In both cases, it’s possible that you’re trying to include a sub-customer. Still having problems? Let us help.
The right side of the screen gives you more information about each, Balance Due and Delivery Method (you can edit the latter if you want). Click the Preview button by each to see what the statement will look like.
Figure 2: Before you print or email statements, you can get an advance look at their layout and content.
When you’re satisfied that everything is correct, click Create/Send Selected Statements. If you’re emailing some statements and haven’t yet specified your form delivery Preferences, a QuickBooks Online Mini-Interview window should open, letting you indicate whether you:
- Want to be copied on outgoing sales forms,
- Want invoices sent as PDFs or plain text in the message body, and/or
- Want summary information or plain text included in the message body if you send PDFs.
The next page will display a message telling you that statements are ready to print, if you’ve chosen that option for any of your customers. If there is a problem with any emails that were dispatched, you’ll be notified on the QuickBooks Online home page.
Note: Statements are not new transactions. They simply report on transactions that have already occurred. Talk to us if you have any questions about which form to use in a given situation.
If you don’t like the look of your statements, you can customize them. Click the small wheel icon in the upper right corner and select Company Settings| Form Delivery | Customize Forms. To see the Preferences that relate solely to statements, go to Form Delivery | Statements.
The timing and frequency of statements are both important. Send too many, and you might confuse customers. As we said before, you don’thave to send statements at all. The Open Item statement, though, can be an element of your ongoing efforts to get paid faster and improve your critical cash flow.
July 2014-5 Ways You Can Use QuickBooks’ Income Tracker
The Income Tracker is one of QuickBooks’ more innovative features. If you’re not using it, it’s highly recommended!
One of the reasons that QuickBooks appeals to millions of small businesses is because it offers multiple ways to complete the same tasks, which accommodates different work styles. Say, for example, you wanted to look up a specific invoice. You could:
- Go to the Customer Center and select the customer, and then scan through the list of transactions,
- Use the Find feature (Edit | Find), or
- Create a report.
There’s also another way you can get there if you have a recent version of QuickBooks: the Income Tracker. (Note: Only the Administrator or a staff member with the correct permissions can access this feature. Talk to us about whether to allow other employees to use it, and how to set that up.)
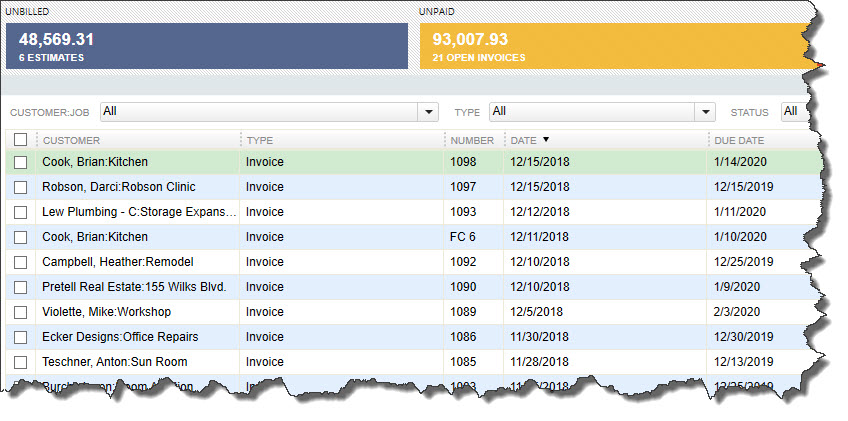
Figure 1: QuickBooks’ Income Tracker provides a visual overview of your company’s income.
That’s the first thing you can do with QuickBooks’ Income Tracker. To get there, either click the link in the vertical navigation bar or go to Customers | Income Tracker.
Four colored bars across the top of the screen represent unbilled estimates, open invoices, overdue invoices, and invoices paid within the last 30 days. Each bar contains two numerical values: the number of transactions of that type and the dollar amount involved.
QuickBooks defaults to displaying all types of transactions, but when you click on a bar, the screen changes to show only that type of transaction.
You can also filter the table of transactions using the drop-down lists below the colored bars. Your choices here include Customer:Job, Type, Status (Open, Paid, etc.) and Date (range). Click the arrow to the right of each filter’s label to display your options.
The column labels below these lists will change depending on the transaction type that’s active.
More Functionality
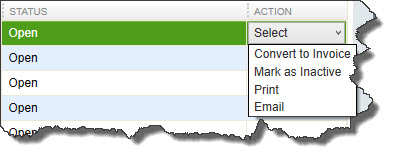
The Income Tracker is great for simply viewing groups of transactions; double-clicking on one will open the original form. You can also open them by selecting an action to take. For example, open your estimates list and click on a transaction to highlight it. Then click the arrow next to Select in the Action column at the far right end of the row.
Figure 2: You can modify transactions like estimates from within the Income Tracker.
If you choose the first option here, QuickBooks opens a small window that asks you whether you’d like to create an invoice for 100 percent of the estimate, a percentage of it, specific items, or percentages of each item. When you make your selection and click OK, a completed invoice form opens, which you can then check over and save.
As you can see above, you can also mark the estimate as inactive, print it, or email it.
Each transaction type supports a different set of actions. In the open invoice action column, as you’d expect, you can click the option to Receive Payment, which opens the Customer Payment window with the customer and amount due already filled in. This can be edited to reflect a different amount, or you can just accept it as is, then save it.
Flexible Forms
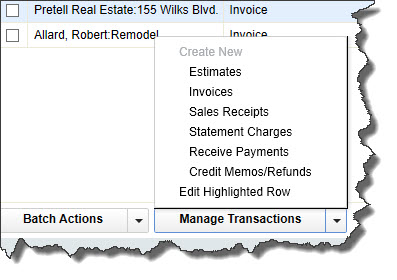
You can even create a new transaction within the Income Tracker. Click on the arrow next to Manage Transactions in the lower left corner of the screen and select the form you want.
Figure 3: You can open new transaction screens from within QuickBooks’ Income Tracker.
The Income Tracker also provides one of the fastest ways to print multiple forms. Just select the transactions you want to print by clicking in the box in front of them, and then click the arrow next to Batch Actions in the lower left corner.
Finally, you can edit transactions from here, too. Either double-click on one or select it and click Edit Highlighted Row in the Manage Transactions menu.
QuickBooks’ Income Tracker doesn’t do anything that can’t be done another way in the program. But it provides an excellent one-glance view of the current state of your receivables movement.
If you’re consistently seeing patterns that you don’t like, call us. We can evaluate your receivables process and suggest ways to accelerate it. Even if your sales aren’t increasing, getting that “PAID” stamp on invoices quickly will improve your cash flow and strengthen your confidence as a business manager.


