November 2012 – Are You Defining Items in QuickBooks Correctly?
If you are currently using items congratulations. If you have never used items than you are not utilizing QuickBooks to the fullest extent. Create item records in QuickBooks carefully, and QuickBooks will return the favor by running useful, accurate reports.
Obviously, you’re using QuickBooks because you buy and/or sell products and/or services. You want to know at least weekly — if not daily — what’s selling and what’s not, so you can make informed plans about your company’s future.
You can receive the information from the reports that you so painstakingly customize and create. But their accuracy depends in large part on how carefully you define each item. This can be a laborious process, but it’s a critical part of QuickBooks’ foundation.
Figure 1: Clearly-defined items result in precise reports.
.
QuickBooks’ Item Lineup
You may not be aware of all of your options here. So let’s take a look at what you see when you go to Lists | Item List | Item | New:
Service. Simple enough. Do you or your employees do something for clients? Training? Construction labor? Web design? This is usually tracked by the hour.
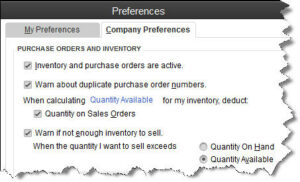
Inventory Part. If you want to maintain detailed records about inventory with up-to-date information about value, quantities on hand and cost of goods sold, you must define these items as inventory parts. Before you start creating individual records, make sure that QuickBooks is set up for this purpose. Go to Edit | Preferences | Items & Inventory | Company Preferences and select the desired options there, like this:
Inventory Assembly. Just what it sounds like; it’s sometimes referred to as a Bill of Materials. Do you sell items consisting of multiple individual products, services and/or other charges (though you may also sell the parts separately)? If you’re planning to track the compilations as individual units, then you must define them as assemblies.
Non-Inventory Parts. If you don’t track inventory, you can set up items as non-inventory parts. Even if you do track inventory, there may be times when you’ll want to use this designation. For instance, you might sell something to a customer that they asked you to obtain, but you don’t plan to stock it. In that case, QuickBooks only records the incoming and outgoing funds.
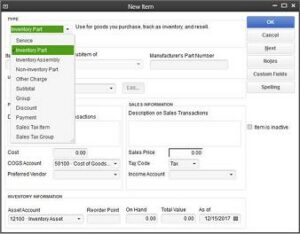
Other Charges. This is a catch-all category for items like delivery charges or setup fees. There are no units or measure for Other Charges. Other Charges are standard costs.
Groups. Unlike assemblies, Groups are not recorded as individual inventory units. Use this designation when you sell a combination of items together frequently but you don’t want them tracked as one entity.
Discount. This is a fixed amount or a percentage that you subtract from a subtotal or total.
Payment. Normally, you would use the Receive Payments window to record a payment made. But if your customer has made a partial or advance payment upfront, use this item to subtract it from the total when you create the invoice or statement.

Sales Tax Item. One sales tax, one rate, one agency.
Sales Tax Group. If a sale requires two or more sales tax items, QuickBooks calculates the total and displays it for the customer, but the items are tracked individually.
Additional Actions
The Item menu provides other options for working with items. You can:
• Edit or delete
• Duplicate
• Make inactive
• Find in transactions and
• Customize the list’s columns.
Let us know if you’re not confident about items you’ve already created or if you’re just getting started with this important QuickBooks feature. Some extra work and attention upfront can save you from hours of back-tracking and frustration – and from reports that don’t tell the truth.
September 2012 – Zero In On Key Report Figures
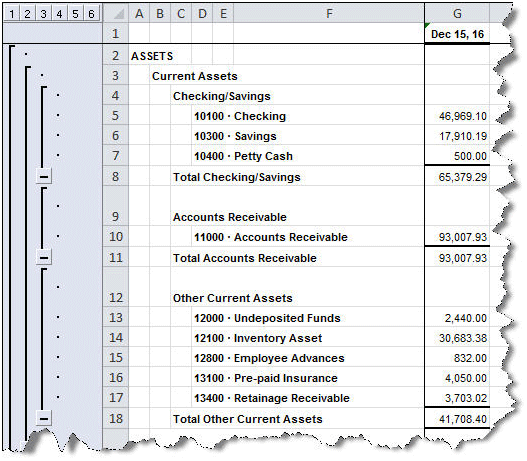
You’ve undoubtedly created reports that were so lengthy that you got tired of scrolling up and down to find totals for each individual section. QuickBooks lets you collapse and expand reports to see primary totals only, but this command affects the entire report. If you want to just collapse a section or two, here’s how you do it. As an example, go to Reports | Company & Financial | Balance Sheet Standard. In QuickBooks 2012, you’d click the Excel button (your version may say Export). Indicate that you want to create a new worksheet and click Advanced. This window opens:
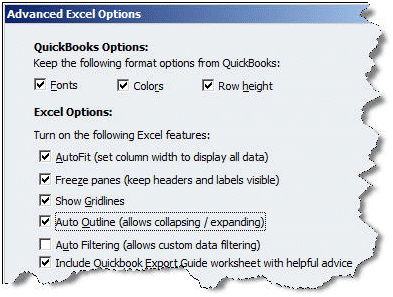
Make sure that Auto Outline (allows collapsing/expanding) is checked, then click OK and start the export. When your report opens as an Excel spreadsheet, you’ll notice that there is a series of vertical lines to the left of your data, and a group of numbers that corresponds to them running above horizontally.
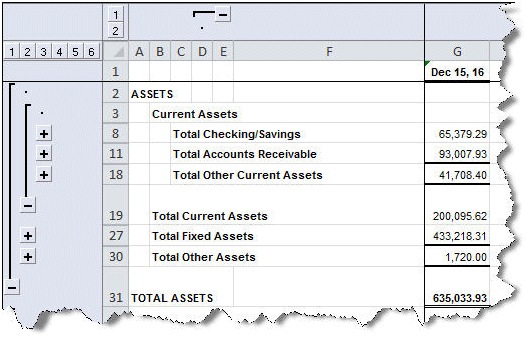
Figure 2: Excel’s Auto Outline feature adds tools to the left of your data that let you collapse and expand subsections.
To collapse a section so that only the totals show, click on the minus (-) sign next to the line that should remain (in this example, it’s Total Checking/Savings). Do the same for Total Accounts Receivable and Total Other Current Assets. Then scroll down and do the same thing for the other asset subtotals. Here’s what you’ll see:
Auto Outline is a very useful feature, but there’s more than one way to implement it. And its availability and operation can vary in different versions of both Excel and QuickBooks. We can help you master this, as well as other QuickBooks-to-Excel tools.
Hidden Gems
Here are some other less-commonly-used QuickBooks features that you may want to try:
- Getting ready to send an invoice but want to check a related transaction from the same job a few months ago? You could use the Find tool, which is a seriously underused feature that can often answer a question quickly. But that takes a few clicks. Instead, just hit Ctrl + L, and that Customer/Job screen pops open in the Customer Center. Click Ctrl + E from that screen to see the Edit Job dialog box.
- CTRL+Y on transaction screens opens the Transaction Journal, which shows you the behind-the-scenes debits and credits. If the Account column is truncated, click and drag the little diamond symbol to the right.
- QuickBooks offers numerous helpful payroll reports, but it also transfers your data into Excel for more comprehensive views of your employee compensation information over customizable date ranges. Go to Reports | Employees & Payroll | Summarize Payroll Data in Excel and More Payroll Reports in Excel.
Figure 4: Summarize Payroll Data in Excel is actually a series of reports, available by clicking this navigational bar at the bottom of the screen.
- Allowing multiple windows in QuickBooks and tired of clicking the little x repeatedly to start with a clean slate? Click Window | Close All. This drop-down menu also displays the list of open windows; click on one to go there.
- There may be no more frustrating task than reconciling your bank accounts. If you’re using online banking, consider doing this more than once monthly. Also, don’t let QuickBooks do an automatic adjustment for a considerable discrepancy unless it was a mistake made by a financial institution: Click the Undo Last Reconciliation button and try to find the error. And don’t forget about the Leave button. You may do better attacking it later.
- If you occasionally need to enter a transaction for an entity that isn’t a customer, vendor or employee, go to Banking | Other Names List. You can add, edit and delete these, as well as converting them to customers, vendors or employees.
There’s more than one way to do a lot of things in QuickBooks. We can tell you about more, and evaluate your workflow to see how else we can improve your accounting experience.


